
Computer Graphics
Smoke figure
In this tutorial, we'll create an ethereal figure rising from smoke. Creating realistic smoke is a different and complex topic, therefore we'll use an existing image of smoke. I downloaded one from creativity103.com and here is a copy of the image:
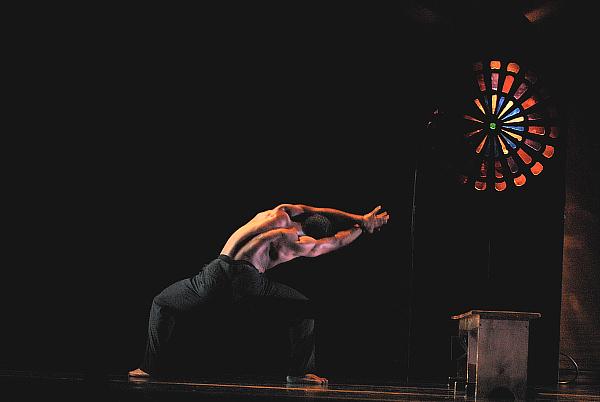
We will also need a photo of an impressive human figure. We want some image that has nice constrasting shadows and stands out clearly from the (preferrably black) background. I picked a photograph by Leni Williams of the dancer Winston Dynamite Brown from Wylliams/Henry Contemporary Dance Company. Download the image here:
1. Prepare images
Open both images in GIMP. (When asked about existing embedded color profiles, choose to convert it)


We start by desaturating both images to make them black and white: Colors | Desaturate...


Note: I forgot to desaturate the smoke layer in the next images so don't be confused if your smoke looks different to mine. I'll fix it in step 10.
2. Compose the body and the smoke
Copy a rectangular area (Toolbox | Rectangle Select Tool (R)) of the dancer image containing his torso and paste it to the smoke image. Don't forget to either convert the new floating selection in Layers panel to New layer..., or paste it as new layer (Edit | Paste as | New layer.)


Set the layer Mode in Layers panel for the man layer to Screen. This will make the bright areas of the layer opaque and the dark areas transparent.
3. Adjust transparency
Notice that although we set the layer mode to Screen, the rectangle around the man is still visible. This is because the background of the dancer photo is not 100% black and thus it is not 100% transparent. Select the man layer and open Colors | Levels dialog.
Do you see the high spike in the left part of the Input levels histogram? These are the naughty dark pixels that refuse to be transparent. Move the leftmost triangle control to the right of the spike. This will make all the brightness values to the left of the triangle appear fully black in the image and thus fully transparent.


Moving the left triangle slider control will also automatically move the middle one and change overall image intensity. Move the middle one back to the center of the whole range.
4. Adjust size and position
Scale up the man layer (Toolbox | Scale tool (Shift+T)) to approximately 180% and move it to the center of the image.
You can see it's a bit jagged around the edges. Set the Filters | Blur | Gaussian blur to 2px and blur the man layer.

5. Pants off!
We will now remove the bottom part of the dancer and leave only the bright torso. Select the Eraser tool (Shift+E), and set its brush (bottom part of the Toolbox panel) to Circle fuzzy (19) and Scale it to 5.00. This will give you a big and soft eraser. You can erase the pants and even the inside part of the lower back of the dancer. Leave the bright outlines of his body intact.


6. Create small streams of smoke
Open the IWarp filter dialog: Filters | Distorts | IWarp. This filter is similar to Photoshop's liquify tool and basically it bends and stretches parts of the image.

Set the deform radius to 10 pixels (we will be creating thin stripes of smoke) and the deform amount to 0.70 (we will be deforming the image in a strong but not brutal way). Now start drawing in the preview part of the IWarp dialog window. Our goal is to stretch (move) the bright parts of the dancer's back downwards to make them look like stripes of smoke.

It requires some time and practice to learn how to use the IWarp tool. Take your time. Also, try experimenting with the deform radius and deform amount to achieve the best effect.

7. Add more smoke to the body
We can copy some suitable parts of the smoke layer and paste them over the man layer to further enhance the smokey appearance of the body. Good parts to copy are in the top part of the smoke layer - isolated curls and streams of smoke. Use the Free select tool (F) (a.k.a. lasso) to copy some. Make sure you select the smoke layer before copying!
Paste it as a new layer and set its layer mode to Screen. Move it to the right hand of the dancer and rotate it by approximately -90 degrees. This will make it appear as an extension of the hand.


Try repeating this with different smoke curls and on different parts of the body. Play around. You can even IWarp the newly created layers to make them better aligned with the underlying body. If some parts of the copy-pasted smoke layers don't fit, you can erase them just as we did in step 5.

8. Mask out underlying smoke
To make the body appear clearer, we will hide some parts of the background smoke layer. Select the smoke layer, add a layer mask to it (Layer | Mask | Add layer mask). When asked, choose White (full opacity) as the initial value of the mask.
And since you're already making masks, add one mask to the man layer as well.
Then create a new layer, fill it with black color and drag it to the bottom of the layer panel. This is how your layer panel should look like now:


Select the smoke layer's mask and pick the Paintbrush tool. Select foreground color to 100% black and set the brush properties to Circle fuzzy (19), scale 2.0.
Paint black color in the smoke layer's mask to hide parts of the smoke that occlude the top part of the body - shoulders, neck, head. Mouse over the following screenshot to see the difference:

9. Enhance body contrast
Last touch to the smokey image of the body will be done by darkening some semi-dark areas of the body. This will enhance the impression that the body is composed of smoke. We will use the Dodge / Burn (Shift+D) tool to achieve that.
The Dodge / Burn tool is a special type of brush that does not paint color to the image. Instead, it either brightens up (dodge) or darkens (burn) the affected pixels. We can also specify what type of pixels will be affected based on their brightness (shadows, midtones or highlights). See the settings for the tool below:


Pick a rather thin brush (Circle fuzzy (19), Scale 1.0) and set the tool to Burn because we will be darkening the body. Set the Range to Shadows because we only want to darken the dark areas. We want to leave the bright areas (highlights) and midtones be.
Now select the man layer and paint the insides of the dancer's arms. Watch as the dark becomes darker but the bright remains the same. Use this to remove the semi-dark areas inside the arms and also some parts of the back. Mouse over the following screenshot to see the difference.

10. Final touch
To improve the image a bit, you can use the masks you created in step 8 to hide some parts of the body or show some parts of the smoke to better integrate the body into the smoke:

Finally, we will tint the whole image into shades of blue to give it a moody cold look.
Change the foreground color to bright blue (R:80, G:150, B:255). Create a new layer and when asked, set its fill type to Foreground. This will make a colored rectangular layer. Or, alternatively, create a new layer and fill it with the Bucket fill tool (Shift+B) using the blue color.
Put the new blue layer on top of all other layers and set its mode to Overlay. This way the blue color will interact only with the brigher parts of the underlying layers, thus coloring the grays into blues.

P.S. for some more fun, try to change the blue layer's mode to Divide or change its color. You can even try a gradient fill on the blue layer, etc.
11. Own work
Now try this on your own. Find a nice picture of a body (or try with this one), pick another smoke background from Creativity 103's nice library of free smoke photos or from some place else and try to reproduce the process.